Biscoff cake

I haven’t written here since 2021. Life was life-ing, and I drifted away. But I’m back now, and keeping things simple, like the days of yore when you could just find a recipe and get straight to it – no long history, no fluff. This is my Biscoff cake, which has become a family favorite. I made one for my sister-in-law recently. And while I was at it, made a second one for my work family. They enjoyed it, so I figured I’d post the recipe here to share. It’s adapted from a peanut butter cake recipe I found a while back, with a few modifications to sub my favorite ingredient, Biscoff cookie butter spread (and a few Biscoff cookies for good measure.) Get the printable recipe here, or scroll below.

Biscoff cake on a cake stand

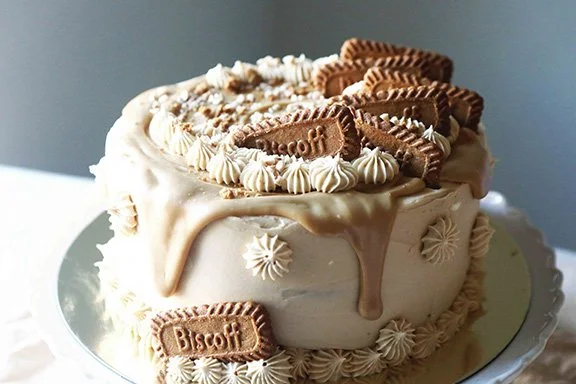
Biscoff cake with Biscoff frosting and ganache

Adapted from this peanut butter cake recipe from Melissa Diamond.

Makes three 9-inch layers or four 6-inch layers; baking time: 25-30 minutes (time to frost/decorate: 1-2 hours)

Cake ingredients:

  • 1 package yellow cake mix

  • 1 small (3.4 oz) package cheesecake pudding mix

  • 1 cup granulated sugar

  • 1 cup all purpose flour

  • 1 cup Biscoff cookie butter spread

  • 1-1/2 cups water

  • 1/4 cup vegetable oil

  • 3 large eggs

  • 2 tsp. vanilla extract

  • 4-5 Biscoff cookies, crumbled

  • cooking spray

  • other materials to have handy: parchment paper & plastic wrap

Frosting ingredients:

  • 2 sticks unsalted butter (softened or at room temperature - do not melt!)

  • (1) 8 oz. package cream cheese (softened or at room temperature)

  • 1 cup Biscoff cookie butter spread

  • 6 cups powdered sugar

  • 1 tsp. vanilla flavor

  • 1/2 tsp. salt

  • Heavy whipping cream (see instructions for amount)

Ganache ingredients:

Depending on amount needed, these amounts may need to be adjusted:

  • 5 oz. heavy whipping cream

  • 5 oz. white Ghirardelli chocolate bar (cut into chunks)

  • ½ cup Biscoff cookie butter spread

Cake directions:

  1. Preheat the oven to 350 degrees F.

  2. Prepare baking pans by lining bottom with parchment and spraying sides of pans with cooking spray. Set the pans aside.

  3. Place cake mix, pudding mix, sugar, flour, Biscoff, water, oil, eggs and vanilla in a large mixing bowl. Blend with an electric mixer for 1-2 minutes until thoroughly mixed. Add crumbled biscoff cookies and mix until well incorporated.

  4. Divide the batter between the prepared pans, smoothing it out with a spatula or spoon as needed.

  5. Place the pans in the oven.

  6. Bake the cakes until they spring back when lightly pressed with your finger or test by inserting a toothpick and if it comes out clean, your cakes are done!

  7. Using potholders, remove the cakes from the oven. Careful, they’re hot!

  8. Allow the cakes to cool for a few minutes. Run a knife along the edge of the cakes in the pan and invert the cakes onto plastic wrap to remove.

  9. Wrap the cakes with plastic wrap and freeze for a few hours or overnight until you are ready to decorate. This seals in moisture and makes the cakes much easier to decorate.

Frosting directions:

  1. In a stand mixer fitted with a paddle attachment, add the butter, cream cheese, biscoff, salt and vanilla to the mixing bowl and blend well.

  2. Scrape down the bowl.

  3. Gradually add the powdered sugar in stages, mixing well* in between.

  4. Depending on how thick it is, you may choose to add a few splashes of heavy whipping cream.

  5. You’ll want it to be light and fluffy for easy spreading, so mix at high speed, whipping it for about 2-4 minutes. The icing will get lighter in color and will become more fluffy and of good spreading consistency.

  6. Add the frosting between cake layers and cover top and sides of cake. Smooth as desired.

    *Pro tip: when mixing in powdered sugar, cover the mixing bowl with a clean dish towel to keep the sugar dust from flying around.

Ganache directions:

  1. Place the heavy cream in a microwave-safe bowl. Heat for 30-45 seconds until steaming.

  2. Gradually add in the chopped white chocolate until melted.

  3. Add in the Biscoff and stir well until blended.

  4. At this point, you can test it on the side of the bowl to see how well it drips. As it cools, it will thicken, so it really depends on the consistency you want for your cake. Pour on top of the cake and with a spoon, gradually push it to the edges to allow it to drip down the side of the cake.

  5. Chill the cake in the fridge until 1-2 hours before you plan to serve.

Left: the stars of the show: cake mix, pudding mix, Biscoff spread and Biscoff cookies; Right: mix the crushed cookies into the batter for even more Biscoff goodness!

Left: the stars of the show, including cake mix, pudding mix, Biscoff spread, and Biscoff cookies; Right: Add some crumbled Biscoff cookies into the batter for even more goodness!

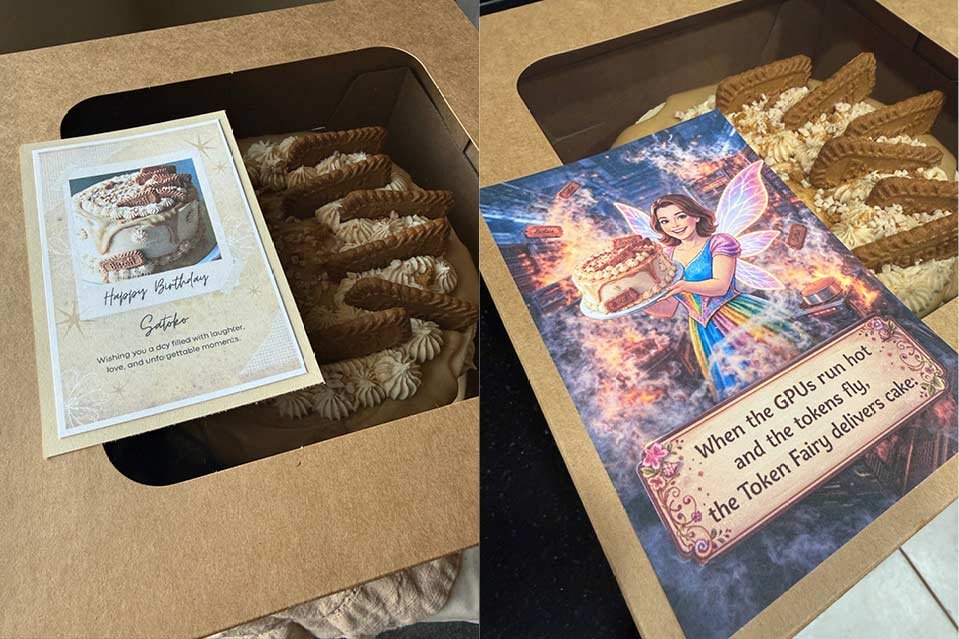
Cakes packaged and ready to go!

Super-soft Sugar Cookies

I was in the mood for some holiday baking, so I tried out a new recipe for copycat Crumbl cookies. A couple of Crumbl cookies locations opened fairly recently in our town and they might be my new favorite dessert spot. Crumbl rotates their menu every week so they offer four to five fun new flavors to try each week. Their cookies are also HUGE in size as well - almost bigger than my hand. Their classic sugar cookies might be my favorite. They are pillowy-soft with a hint of almond flavor.

If you don’t have a Crumbl location in your town, this recipe from the Lifestyle of a Foodie blog is really close to the real thing! Give it a try. I did modify the frosting recipe since I didn’t have heavy cream. The recipe and a few helpful tips are listed below.

Sugar cookies

Sugar Cookies

Dough Ingredients:

  • 1 stick salted butter (softened)

  • 1/4 cup vegetable oil

  • 1/2 cup granulated sugar

  • 2 Tbsp. powdered sugar

  • 1 large egg (room temp. is best)

  • 1/2 tsp. vanilla extract

  • 1/4 tsp. almond extract

  • 2-1/3 cups flour

  • 1/4 tsp. salt

  • 1/4 tsp. cream of tartar

  • 1 tsp. baking powder

Frosting Ingredients:

  • 1 stick salted butter (softened)

  • 1-1/2 cups powdered sugar

  • 1/4 tsp. almond extract

  • 1 drop pink gel food coloring (optional)

  • sprinkles (optional)

Instructions:

  1. Preheat oven to 350 degrees. Line a baking sheet with parchment paper or aluminum foil for easy cleanup. No need to grease; the cookies shouldn’t stick due to oil/butter in the dough.

  2. In a large mixing bowl, cream the butter, oil, sugar and powdered sugar.

  3. Add the egg*, vanilla, almond extract and continue mixing to combine.

    *The recipe I found said the egg should be at room temp., but because I’m not patient, mine was straight out of the fridge/still cold and it seemed to work just fine. Next time, I will try room temp. to see if it makes a difference.

  4. Add remaining dry ingredients and mix well until dough forms a ball.

  5. Use an ice cream scoop or measuring cup* to measure out dough balls so cookies are all uniform. Flatten the balls using a rolling pin or the bottom of a large glass to around 1/2” thick. Note that dough doesn’t really spread as it bakes.

    *I used a 1/4 cup measuring cup to produce slightly larger cookies than an ice-cream scoop. To get the signature Crumbl cookie size, you could go slightly larger than 1/4 cup.

  6. Bake the cookies on an ungreased cookie sheet for 7-9 minutes. To get the signature Crumbl look/texture, you don’t want these to be brown at all. They will look under-baked, but they will be fine!

  7. Let the cookies cool for 15-20 minutes to set.

  8. While cookies are cooling, you can whip up the frosting. Once cookies have cooled, spread the frosting, add sprinkles and enjoy.

Sugar cookies

Summer Reads: Joyful

On this lazy Saturday, I’m revisiting a favorite book, Joyful, by Ingrid Fetell Lee. This book explores the impact of design on the environment, behavior and emotions. This is perfect for designers, creatives or anyone else wanting to cultivate joyful experiences in their lives. It’s certainly made me much more aware of the use of color, shapes and sounds in the environment and has influenced the way I approach my creative projects.

I find that I’m naturally drawn to artists and photographers who use color to communicate. One of my favorites is Brittany Wright, a photographer who specializes in food gradient photography. A few of the principles from Joyful are revealed through her work, including abundance and harmony.

Examples of her work may be found on her website, Wright Kitchen:

Wright Kitchen features vibrant and colorful food photography

Wright Kitchen features vibrant and colorful food photography

Several chapters of the book resonated with me, including a section on harmony featuring the quilters of Gee’s Bend. I love quilting, so I was intrigued to check out their work. Their quilts may be based on common quilting patterns, but are entirely improvisational. I use improvisational techniques in my own quilting because I love the freedom it lends, the organic nature of it, and the surprise factor involved, since I don’t always know how a quilt will look until it’s almost finished.

I’m looking forward to taking a deeper dive into the book this second time around and may decide to explore the key concepts outlined in the book in future blog posts.

Summer Fun: Rain Lilies Farm Stand Visit

We’re back in Texas after a fun trip back home to South Carolina. It was SO nice to visit with family again after a year and a half! I’m thankful that things seem to be getting back to normal and that much brighter days are ahead. It’s fun to see people making up for lost time with festive celebrations and new ventures.

One of the things I missed in 2020 was being able to visit Rain Lilies Boutique at the farmers market. I was still able to shop online, but it helps to be able to see Tru’s beautiful offerings in person. Imagine my excitement when I found out that she would be opening a new farm stand this month. It would be perfect timing, since I would be returning home from vacation just before opening day! I wanted to make the most of the last few days of my vacation, so I kept those vacation vibes going by taking a mini road trip to Sherman, TX for the soft opening. I loved seeing (and smelling!) all of my favorite soaps again displayed perfectly in the bright and cheery yellow wagon. All of my favorite products were there, including the lavender relax pillows and essential oil blends, but I loved seeing some new products as well — especially the beautiful flower bouquets!

Learn more at her Instagram or Facebook pages or take a virtual tour of the stand.

Rain Lilies Farm Stand

Rain Lilies Farm Stand

So many cute details!
Lavender Relax Neck Wrap

Lavender Relax Neck Wrap

Missing Travel and a Personal Project for 2021

2020 was the year of no travel thanks to Covid-19, and so far, 2021 is looking to be more of the same. Thankfully, there is light at the end of the tunnel as vaccines become more readily available. We are staying put until we get ours, but in the meantime, I’m focusing my energy on a fun travel-related project. Each year, I enjoy taking on a new personal project of sorts to keep my creative juices flowing and learn new skills. Over the years, I’ve learned photography, cake decorating, calligraphy and cold process soap making, among other things. I found a great article that explains the benefits of personal projects. The article says “starting a personal project can offer benefits you might never have imagined. (You’ll connect the dots looking backwards.)” This is so true! Photography is a skill I use almost daily and it has enhanced my life in many ways! I’ve documented weddings, birthdays and numerous other happy occasions. It has also given me a different perspective and lens with which to view the world.

Speaking of viewing the world, since there’s not much of that happening these days, I thought it would be fun to put together a monthly travel-related box for my nieces, who are homeschooling this year. This box would serve as a geography and cultural lesson, and would give them something to look forward to each month. In turn, I would learn new things about places I would love to visit someday. Win-win!

Luckily, we live in a fairly culturally-diverse city and there are several local shops and markets that offer goods from Japan, India and beyond. One weekend in late December, I set out in search of some unique goodies for January’s box. I happened to remember that there is a Scandinavian shop, The Wooden Spoon, in downtown Plano that I had not had the opportunity to visit just yet, so I made my way there.

My visit to the shop was such a fun experience! It was like a mini vacation. The shop’s owner, Gwen, gave me a personal tour and even provided some educational materials for my nieces when I told her about the project. The shop is filled with a fantastic variety of food items and gifts from Denmark, Sweden, Iceland, Norway, and Finland. Gwen has even written some children’s books, so I made sure to pick up a few of those for the boxes. It was difficult to choose from all of the fun Nordic locations, but I finally decided to focus on Sweden for January.

January’s box was filled with Swedish activity books, flag stickers and edible treats. I also included a couple of assignments, including instructions for making Swedish meatballs.

I wanted to give them a record of their “travels” for the year, so I was able to locate some mini passports that even have pages for stamps! I’m planning to include some stamps for each country, and to make these “trips” feel as realistic as possible, I even designed some airline boarding passes.

Here’s a look at what I included for January:

The mini passports I found look so realistic!

They can’t leave without their boarding passes!

Boarding-Passes.jpg

Rare Snow Day + Turmeric Ginger Tea

Snow-covered-rock-garden.jpg

We’re hunkered down inside due to a rare snowstorm. It hasn’t snowed significantly here in the last few years so we’re enjoying this sweet Valentine’s treat. It’s the perfect day for sipping some hot tea. I found this Rishi Turmeric Ginger tea recently. It has a great flavor with a hint of spice and a sweet finish. I didn’t see any sugar listed in the ingredients, so maybe it’s a combination of the other ingredients, including licorice root, lemongrass, orange and lemon peel, and orange and lemon essential oils that give it that slightly sweet taste. This would also be great with a bit of honey and a squeeze of lemon juice.

Chinese Steamed Fish with Ginger and Scallions

Chinese New Year is just around the corner. I look forward to it every year, and even though this year may look a little different thanks to the pandemic, we will still celebrate with some great food! I can guarantee that Chris will whip up some of his favorite dishes, including his famous steamed fish with ginger and scallions.

He was able to catch some fish this weekend, so we decided to document the process of making this special dish!

For the recipe below, we used fresh black bass, but this recipe would work great with flounder or other white fish. To steam the fish, we used a wok, a steaming rack and a lid to hold in the steam. If you don’t have a wok, you can use a large pot with a lid instead. In a pinch, an empty tuna can can be used as a substitute for a steaming rack.

Steamed fish with ginger and scallions

Chinese steamed fish with Ginger and Scallions

Ingredients:

Ingredients for steamed fish:

  • 4 white fish fillets (black bass, flounder or other white fish)

  • 7-8 stalks of green onions, or scallions (green portion of stalk only; reserve the bottom/white portion of stalk for the sauce/garnish noted below)

  • 3-4” long piece of ginger root, peeled and thinly sliced; reserve 4-5 slices for the sauce and 1-2 slices for the garnish below)

  • 1 teaspoon salt

  • 4 Tablespoons of rice cooking wine (also known as Shaosing/Shaoxing wine)

Ingredients for ginger and scallion sauce:

  • ginger, finely minced (from the 4-5 slices you reserved above)

  • white portions of green onion stalks (from reserved ingredients above), thinly cut lengthwise into “matchsticks” (save a few of these for garnish below)

  • 1/2 teaspoon sesame oil

  • 2 Tablespoons vegetable or canola oil

  • 4-5 Tablespoons seasoning sauce (Golden Mountain brand preferred)

Ingredients for garnish:

  • 1-2 slices ginger, thinly cut into “matchsticks” (from the slices you reserved in fish ingredients above)

  • slices of green onion stalks you reserved from sauce ingredients above

Instructions:

  1. Prepare your steaming set-up on a stovetop. We used a wok filled with a couple of inches of water, a steaming rack, a ceramic plate which fits the wok, and a lid to cover everything while steaming.

  2. Cut the green onions and ginger as described in ingredients above. Be sure to reserve the green parts of the green onion stalks for the steamed fish and the white parts for the sauce and garnish. Also, be sure to reserve a few slices of ginger for the sauce and garnish.

  3. Rinse the fish fillets with cold water and place them into a bowl or gallon-size ziplock bag. Pour the cooking wine over the top to help clean the fish.

  4. Place the green portions of green onion stalks on a plate that is large enough for all of the fish fillets. Be sure this plate will fit in the wok or cooking pot! Layer on the slices of ginger next. Remove the fish from the bowl/bag and layer the fillets on top of the ginger and onions.

  5. Sprinkle the fish fillets with salt and set aside.

  6. Bring the water in the wok/pot to a boil.

  7. Place the plate of fish on top of the steaming rack and cover with a plate. Allow the fish to steam for 15-20 minutes.

  8. While the fish is steaming, prepare the sauce.

  9. Heat the canola oil in a small skillet. Add the chopped ginger and sauté for 1-2 minutes. Add the thinly sliced green onions to the pan and allow to cook for 30 seconds or until soft. Add the sesame oil and seasoning sauce and cook for 1-2 minutes more, then remove from heat.

  10. After the fish has steamed, move the cooked fillets to a clean plate.

  11. Pour the sauce on top of the fish.

  12. Garnish with a few of the remaining thinly sliced onions and ginger and serve.

Prepare the ingredients:

Clean the fish by adding rice wine to a bag; ensure the fish is evenly covered with the wine:

Prepare to cook the fish:

Prepare the sauce:

Plate the fish:

Enjoy!

Steamed fish with ginger and scallions

Phở Bò - Vietnamese Beef Noodle Soup

I haven’t posted in quite some time, but the latest news is that we’re currently in the middle of a stay-at-home order due to the Covid-19 pandemic. We really only get out to get groceries these days and we’re cooking a TON. Most restaurants are now only open for carry-out orders, but our favorite Phở place is totally closed for the foreseeable future. Desperation has set in, so the other day, Chris called his sister to get her recipe.

He wasn’t able to find the exact ingredients she uses. Apparently, everyone had the same idea to make Phở and cleaned out the soup seasoning section of the market! He grabbed something that looked close and decided to try it out.

After a couple of attempts using the ingredients he was able to find, he was able to nail down a recipe that’s close to what we’re used to. This will help us get by until our restaurant reopens.

Pho Bo - Vietnamese Beef Noodle Soup

Phở Bò

Ingredients:

Ingredients for soup:

  • 6 cups water for soup broth (additional water will be needed to clean the meat and boil the noodles)

  • 2 phở boullion cubes

  • 2 yellow onions, cut into quarters

  • 2 star anise

  • 1 Tablespoon salt

  • 2-3” long piece of ginger root, peeled and thinly sliced

  • 1 can (28 oz.) beef broth

  • 2 pounds of fresh oxtail

  • 1 pound precooked meatballs

Ingredients for garnish (optional):

  • mint leaves (minced)

  • bean sprouts (preferably steamed)

  • culantro (ngò gai); if culantro is not available, you can use cilantro.

  • thai basil (minced)

  • green onions (sliced)

  • lime wedge

  • sriracha sauce

  • hoisin sauce

Instructions:

  1. In a large pot, add 6 cups of water, 2 cubes of boullion, 1 Tbsp. salt, 2 quartered yellow onions, ginger slices and star anise. Bring to a boil.

  2. Before adding the meat to the pot of soup, you’ll need to clean it thoroughly. This ensures a nice clean broth. In a separate pot, fill halfway with water and bring to a boil. Add oxtail and cook for 10 minutes. Remove and rinse oxtail.

  3. Add the cleaned oxtail to the soup pot.

  4. Add 1 can of beef broth to the soup pot.

  5. Cook for 2-1/2 hours on medium to low heat, covered.

  6. After 2-1/2 hours, remove the star anise and ginger.

  7. Add meatballs to pot and cook for another 10 minutes.

  8. In a separate pot, fill halfway with water and bring to boil.

  9. Add noodles to boiling water and cook for 5 minutes. Drain. Repeat this step once more to remove as much starch as possible from the noodles.

  10. Assemble the ingredients in a bowl, adding noodles first, then broth with meat, then add various garnishes (mint, onions, bean sprouts, basil, lime and sauces to taste.)

Beef broth and phở seasoning are key ingredients for flavor.

Ginger and star anise also add to the layers of flavor in the broth.

Before adding the meat to the broth, it’s important to clean it by boiling in a separate pot. The resulting foam indicates the meat has been cleaned and will ensure a clear soup broth. Once cleaned, the meat can be added to the pot containing soup broth.

The oxtail is added to the simmering pot. At this point, cover the pot and simmer on medium to low heat for 2-1/2 hours. After 2-1/2 hours, remove the ginger and star anise and add the meatballs. Cook for an additional 10 minutes.

Rice Noodles

These noodles can be found in the refrigerated section of the Asian market. To prep, just add to boiling water, cook for 5 minutes and drain. Repeat this step once more to remove as much starch as possible from the noodles.

Assorted mint leaves or culantro (ngò gai) can be added for garnish. Other favorite toppings include green onions, bean sprouts, thai basil, lime juice, sriracha and hoisin sauce.

Pho Bo - Vietnamese Beef Noodle Soup

Ginger Lime Soda

I know it's not a tea recipe, but I just HAD to share this tasty concoction with you! It's so refreshing on these hot Texas summer days, where your flip-flops will melt into the sidewalk if you stand in one place for more than 2 seconds. I'll keep this short and sweet, because if you're in need of a icy beverage, you won't want to wade through a long-winded blog post. I have to give a shout-out to the blogger, Kelly Yandell, at The Meaning of Pie blog for her excellent recipe. I made some minor adjustments because I wanted a little more heat from the ginger. If you like a little less of a bite, I'd recommend reducing the amount of ginger.

ginger-lime-soda1.jpg

Ginger LIme Soda

Ingredients:

  • 1 cup water

  • 1/2 - 3/4 cup granulated sugar (depends on how sweet you want it!)

  • 1 cup grated ginger

  • 1 cup lime juice (approx. 7-8 large limes)

  • Club soda

  • Ice cubes (for serving)

  • Lime (for garnish); optional

Instructions:

  1. Peel and grate the ginger. I use a food processor to make the grating quick and easy. If you end up with more than a cup of ginger, you can freeze the rest for later.

  2. Add water and sugar to a saucepan and bring to a boil (stirring well to dissolve the sugar.) Remove from heat. Add the ginger and allow it to steep for 20 minutes.

  3. While the ginger is steeping, you can go ahead and juice the limes.

  4. Strain the ginger using a fine sieve. Add the lime juice to the ginger syrup.

  5. Allow to cool before serving.

  6. When ready to serve, measure 1/2 cup of the ginger-lime concentrate with 1 cup of club soda. Serve over ice and enjoy!

Ginger-lime-soda2.jpg

The Chocolate Chip Cookie Recipe You Need in Your Life

It's almost 100 degrees here in Texas, which means I really haven't had the urge to fire up the oven lately. But, I just got a text that my brother & sister-in-law are going to be dropping off some delicious home-cooked Thit Kho (Vietnamese braised pork and egg) for dinner. I certainly can't let them leave empty-handed, so I just whipped up a batch of my famous chocolate chip cookies. My nieces and nephews love these cookies and request them anytime there is a family gathering. These cookies are extremely easy to make. They only require a single mixing bowl and a few common baking ingredients. There is one "secret" ingredient, though. Without it, these cookies just won't taste the same. The secret ingredient is actually Quaker High Fiber Instant Maple and Brown Sugar Oatmeal. It needs to be the "high fiber" version because the maple flavor seems to be more prominent in that variety. I also like to think that the "high fiber" content makes these cookies more healthy. Well, maybe not, but they sure are tasty!!

chocolate-chip-cookies.jpg

Chocolate Chip Cookies

Ingredients:

Instructions:

  1. Preheat oven to 350 degrees.
  2. Mix all dry ingredients. Don't add the chocolate chips yet, though!
  3. Mix in the melted butter (must be melted all of the way); add in eggs and vanilla.
  4. Stir well.
  5. Add in the chocolate chips last. If you add them before adding the melted butter, the chocolate will melt and cookies will be dark.
  6. Use an ice cream scoop to measure out dough balls so cookies are all uniform.
  7. Bake the cookies on an ungreased cookie sheet for 9-11 minutes.
  8. Let the cookies cool for 15-20 minutes to set (if you can wait that long before stuffing them into your mouth!)
The "secret" ingredient.

The "secret" ingredient.

nestle-chocolate-chips.jpg
cookies.jpg